Anil's Blog is Best Viewed on GOOGLE CHROME

Friday, December 3, 2010

Dependent LOV in OAF

In this article we are going to create Dependent LOV [List of Values] without writing a single line of code.

Below are the two list of values – LOV we are going to create. Supplier is an independent Lov and SupplierSite would be the dependent to Supplier one.
.
  1. Supplier LOV
  2. Supplier Site LOV

User has to select value in SupplierLov first then only user can select value in SupplierSiteLov.

If user will try to select value in SupplierSiteLov without selecting any value in SupplierLov then error message will come like:


♣  SupplierLOV will be based on SupplierLovVO.

Query for SupplierLovVO :-

   SELECT A.SUPPLIER_ID, A.NAME, A.ON_HOLD_FLAG
   FROM FWK_TBX_SUPPLIERS A

  SupplierSiteLOV will be based on SupplierSiteLovVO.

Query for SupplierSiteLovVO : -

  SELECT B.SUPPLIER_ID, B.SUPPLIER_SITE_ID, B.SITE_NAME
   FROM FWK_TBX_SUPPLIER_SITES B


Ist Step:  In this step we will create SupplierLOV

Here are the steps to create SupplierLov.

  1. In the PageLayoutRN of page*, create a region of type messageComponentLayout.
Now right click on this region and select Item of type messageLovInput & set these property:

ID                                            : SupplierName. 
Search Allowed                        : True
Selective Search Criteria           : True
Prompt                                     : Supplier Name

When a you create a messageLovInput item, JDeveloper automatically creates an inline LOV region (listOfValues style) & Lov mapping for this item.
           
* Here I am assuming that you have created one page, ViewObjects, ApplicationModule.


  1. Select the listOfValues region, right-click and select New > Region Using Wizard to quickly create your results table and bind it to the view object you created above.
 Here SupName#, OnHoldFlag would be item of type messageStyledText and ISupplierId would be type of formValue [Hidden Item].  

            Set the Search Allowed property of SupName# to True for the result table item corresponding to the LOV field on the base page.

  1. Select the messageComponentLayout region, right-click and select New > messageLayout.
 ID                                            : HiddenFieldLayoutRN
           
      Now right-click on messageLayout and select New > item of type formValue
      ID                                            :SupplierIDFV


      4.  Ist Lov Mapping:

LOV Region Item                     : SupName
Return Item                              : SupplierName
Criteria Item                             : SupplierName

*** Special Lov Mapping start here****
IInd Lov Mapping:

Lov Region Item                       : ISupplierId
Return Item                              : SupplierIDFV

*** Special Lov Mapping end here****


2st Step:  In this step we will create SupplierSiteLOV

Here are the steps to create SupplierSiteLov.

  1. Select the messageComponentLayout , right-click and select New > select Item of type messageLovInput & set these property:

ID                                            : SupplierSiteName. 
Search Allowed                        : True
Selective Search Criteria           : True
Prompt                                     : Supplier Site Name

When a you create a messageLovInput item, JDeveloper automatically creates an inline LOV region (listOfValues style) & Lov mapping for this item.
           

  1. Select the listOfValues region, right-click and select New > Region Using Wizard to quickly create your results table and bind it to the view object you created above.

Here SupSiteName, would be item of type messageStyledText and IISupplierId would be type of formValue [Hidden Item]

            Set the Search Allowed property of SupSiteName to True for the result table item corresponding to the LOV field on the base page.
    
      3.  IIIrd Lov Mapping:

LOV Region Item                     : SupSiteName
Return Item                              : SupplierSiteName
Criteria Item                             : SupplierSiteName

***Special Lov Mapping Start here****

IVth Lov Mapping:

Lov Region Item                       : IISupplierId
Criteria Item                              : SupplierIDFV – Created in first step  

Vth Lov Mapping:

Lov Region Item                       : SupSiteName
Criteria Item                             : SupplierName - First messageLovInput ID
Required ��                            : True
Programmatic Query ��          : True  

*** Special Lov Mapping end here****


�� Set the Required property to True for Criteria Items whose values must be populated before the LOV can be invoked (if not, the OA Framework displays an error message in the LOV window).


�� Set the Programmatic Query property to True for any Criteria Items whose values you want to apply to the WHERE clause programmatically. Tip: you might use this approach; for example, if you have supplemental Criteria Items whose values should be used for partial matches instead of the default OA Framework behavior of an exact match (remember that the LOV field value itself is always used for a partial match).


Final look of Supplier & Supplier Site Lov on page & in Jdeveloper:


Thanks
--Anil

Saturday, November 27, 2010

How to Test or Create DBC File on Oracle Apps 11.5.10

Here is a way you can test & create DBC file from the application.

First of all Login to Oracle application for which you want to generate the DBC file referring below URL

http://hostname:port /OA_HTML/ jsp/fnd/aoljtest.jsp
like

In the below page enter the required details such as Apps schema name, Password, SID etc and click on Test


Navigate to end of the page and click on Enter AOL/J Setup Test


On the next screen you can click on Locate DBC File. Here you can see  DBC file you can copy these contents and make a DBC file to be used in OAF development by putting it under $JDEV_USER_HOME/dbc_files/secure folder


We can click on Next link to go to Verify setting in DBC file


We can click on next to test our Application login.


Click on Test Application Login.
Similarly, you have several options on left hand side that you can use as shown below.


Cheers :)
--Anil

Saturday, November 13, 2010

EO based VO Extension in OAF – R12

Thanks Ajay for sharing this wonderful article on View Object extension

In the article we are going to extend QueryVO of EmployeeSearch page.

Our business requirement is to add employee Title and MiddleName column in the results table region


Analyzing the Page

click on “About this Page” link to check that which ViewObject is associated with the table region [ResultsRN]


Here we can see that results table has QueryVO attached to it. Now click on Business Component Reference details and check the path of QueryVO


So now click on QueryVO which is an EO based [FwkTbxEmployeesEO] to check whether it has those attribute or not those we want to add


Here we can see that our VO does not have Title & MiddleName attribute.

So for adding these attribute we need to perform VO Extension.

Now FTP the complete solution package (i.e. oracle.apps.ak.solution) from Application server into myclasses\oracle\apps\ak folder as well as in myprojects\oracle\apps\ak folder.


Open Jdeveloper and create a new OA workspace and project. Name workspace as Extend.jws and project as Extend.jpr.

Now right click on Extend project to open project properties Project ContentAdd to include the standard VO package in current project.


After adding BC4J package i.e. oracle.apps.ak.solution project looks like


Creating New View Object (VO): -

Right click on your project and select New-->Adf business Components-->View Object


Give the package name as oracle.apps.ak.ajay.employee.server, VO name as ExtQueryVO and in the extends property select QueryVO


The next screen allows the addition or deletion of Entity Objects. No change is required here for this extension so simply select Next.

The next pane allows additional attributes to be added or attributes to be removed. In this case add both the MIDDLE_NAMES and TITLE attributes to the selected list

Please note the new attribute you would be adding will be coming as Transient


Click on Next --> Next

Modify your sql statement to add new created attributes
SELECT FwkTbxEmployeesEO.EMPLOYEE_ID, 
       FwkTbxEmployeesEO.FULL_NAME AS EMPLOYEE_NAME, 
       FwkTbxEmployeesEO.EMAIL_ADDRESS AS EMPLOYEE_EMAIL, 
       FwkTbxEmployeesEO1.EMPLOYEE_ID AS MANAGER_ID, 
       FwkTbxEmployeesEO1.FULL_NAME AS MANAGER_NAME, 
       FwkTbxEmployeesEO1.EMAIL_ADDRESS AS MANAGER_EMAIL,
       FwkLookupCode.MEANING AS POSITION_DISPLAY,
FwkTbxEmployeesEO.Middle_Names,FwkTbxEmployeesEO.Title
FROM   FWK_TBX_EMPLOYEES FwkTbxEmployeesEO,
       FWK_TBX_EMPLOYEES FwkTbxEmployeesEO1,
       FWK_TBX_LOOKUP_CODES_VL FwkLookupCode
WHERE  FwkTbxEmployeesEO.MANAGER_ID = FwkTbxEmployeesEO1.EMPLOYEE_ID (+)
       AND FwkTbxEmployeesEO.POSITION_CODE = FwkLookupCode.LOOKUP_CODE
       AND FwkLookupCode.LOOKUP_TYPE = 'FWK_TBX_POSITIONS'
Click on nextNext

Generate RowImpl and click on finish


Now as our attributes were created as Transient hence to fix this issue we have two options:

1. We need to correct our XML file generated as it is a known error with Jdeveloper 10G & earlier versions.
2. Double click on that attribute i.e MiddleName & Title and in the View Object Attribute window, enter attribute name  in 'Expression' column i.e. Title.

Open your ExtQueryVO.xml file in some notepad editor.
Scroll to bottom of that file
Update


With


Save the xml file.
And restart your jdeveloper and check that in attributes its not showing as transient.


Substitute Your New VO for the Parent VO

Now we need to perform the VO substitution For this we will right click on Extend project and open project properties-->Business Components-->Substitutions.

Select the QueryVO in Available and ExtQueryVO in Substitute list and click on Add button and then press Ok button.


FTP VO.xml, .class, .jpx files to $JAVA_TOP appropriate folder and Run jpximporter
java oracle.jrad.tools.xml.importer.JPXImporter $JAVA_TOP/Extend.jpx -username apps -password apps -dbconnection "(DESCRIPTION=(ADDRESS=(PROTOCOL=tcp)(HOST=***)(PORT=****))(CONNECT_DATA=(SID=***)))"


Personalize the page to create new items:-

On QueryPG and click on personalize page  complete view and click on Create Item on Table: Employee Table


Set the item style as messageStyledText. Give the id, prompt , View Instance and View Attribute.


Click on Apply -> return to application. You can notice that the page has new two columns.


That's All :)

Monday, November 8, 2010

AM Extension in OAF

                        Application Module Extension in OAF

Like the Controller extension, AM extension is also not supported by Oracle. However for some business needs we have to extend it sometime.

In this exercise we have taken the standard LabSolutions project (shipped in Oracle Tutorial) for extending application module i.e. EmployeeAM.

This AM can be found under below BC4J package
oracle.apps.fnd.framework.toolbox.labsolutions.server.EmployeeAM

Why we are extending AM:-

This EmployeeAM contains an apply method which subsequently commits the transaction.
//This is standard apply method in EmployeeAM that we are overriding.
public void apply()
  {
    getTransaction().commit();
  }

Our business need is to capture user name and user id at runtime and insert it into a custom table for AUDIT PURPOSE.

Here is the table script
CREATE TABLE xx_audit
(user_id VARCHAR(50),
user_name VARCHAR(50),
last_update_date DATE,
last_update_login NUMBER,
last_updated_by NUMBER,
creation_date DATE,
created_by NUMBER);

Brief Steps of AM Extension with screenshots:-

Step 1:

First create a new workspace and a project for extension

Step 2:

Create two BC4J packages as shown below

oracle.apps.fnd.framework.toolbox.labsolutions.server

This will have the standard AM. Copy the Standard AM files to the BC4J package created above.

and

xx.oracle.apps.fnd.framework.toolbox.labsolutions.server

This package will contain the extended AM.


Step 3:

Now create a new Application module in custom package and set its extends property as shown below


Now in XXEmployeeAMImpl we are overriding the apply method to store the data in custom table.

import oracle.apps.fnd.framework.OAException;
import java.sql.PreparedStatement;
import java.sql.Connection;
public class XXEmployeeAMImpl extends EmployeeAMImpl
{
public void apply()
  {
java.sql.Date d = getOADBTransaction().getCurrentDBDate().dateValue();
try 
{ 
Connection conn = getOADBTransaction().getJdbcConnection(); 
String Query = "insert into xx_audit values(:1,:2,:3,:4,:5,:6,:7)"; 
PreparedStatement stmt = conn.prepareStatement(Query); 
stmt.setInt(1, getOADBTransaction().getUserId()); 
stmt.setString(2, getOADBTransaction().getUserName()); 
stmt.setDate(3, d); 
stmt.setInt(4, getOADBTransaction().getUserId()); 
stmt.setInt(5, getOADBTransaction().getUserId()); 
stmt.setDate(6, d); 
stmt.setInt(7, getOADBTransaction().getUserId()); 
stmt.execute();
} 
catch(Exception exception) 
{  
throw new OAException("Error in Staffing Query"+exception, OAException.ERROR); 
} 
 super.apply();
  }
}


Step 4:

Perform the AM substitution
Double click on project.jpx to open below model window


Step 5:

Run jpximport command

C:\jdevbin\jdev\bin>jpximport C:\jdevhome\jdev\myprojects\LabSolutions.jpx -user
Id 1 -username apps -password apps -dbconnection "(description = (address_list =
 (address = (community = tcp.world)(protocol = tcp)(host =ANIL.apps.com)(port =
1521)))(connect_data = (sid  = VIS)))"
Imported document : /oracle/apps/fnd/framework/toolbox/labsolutions/server/custo
mizations/site/0/EmployeeAM
 Import completed successfully

Sunday, October 24, 2010

Friday, October 8, 2010

Testing VO at design time - OAF Jdev 10G feature

In Jdev 10.1.3 we have the option to test View Object at design time.

Step1: Find the Application Module that you want to test.


Step 2:  Right click on ApplicationModule and select Test.


Step3 : Select connection Name.


 Step 4 In the Oracle Business Component Browser window, double click the EmployeeFullVO1 node to show the employees details. Navigate between the records using the Next button . You can also add or remove record of View Object from this window only.


Thanks
--Anil

java.sql.SQLException: ORA-01008: not all variables bound

In case you are setting bind variables of VO associated with Poplist/MessageChoice .You may face this error.

Suppose you have a query like this in VO
select meaning, 
lookup_code
from fwk_tbx_lookup_codes_vl
where lookup_type = 'FWK_TBX_POSITIONS'
and meaning <> :1

Cause:  
  • You have not binded the View Object Query properly in any of the BC4J components(i.e. AM,VO or CO).
  • You have set View Defination property of messageChoiceBean.

Action: 
  •   Ensure before executing the VO query you are setting the bind variables :-
//VOImpl Code

public void initQuery()
  {
        setWhereClause(null);
        setWhereClauseParams(null);
        setWhereClauseParam(0,"Buyer");
        executeQuery();
  }
  • Instead of setting the View Definition property set the View Instance property of messageChoiceBean.


Thanks
AJ

Restrict user to enter data in CAPS ONLY

Thanks Pranav for sharing this article.

In this exercise we are restricting the user to enter Character in UPPERCASE.


Brief about the steps we are performing
1. Create custom CSS.
2. Attaching this CSS to bean via personalization.


Step1. FTP the latest custom.css from server $Common_Top/html/cabo/style to desktop

Step2. Add the below text in custom.xss


Step 3: Now, FTP the updated custom.xss file to same path on the server i.e. $Common_Top/html/cabo/style.


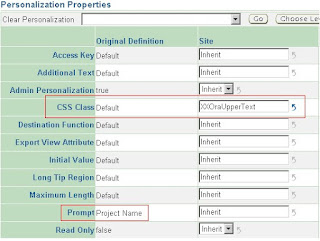
Step 4: Set the CSS Class Property through Personalization.

CSS Class : XXOraUpperText


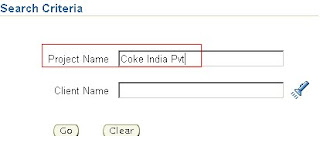
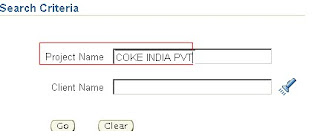
Finally after setting css for Project Name bean user can only enter in UPPERCASE only.


Here is another more simpler approach.

Here in the processRequest we are setting the CSS to the Bean without making changes to custom.xss file.

import oracle.cabo.style.CSSStyle;
import oracle.apps.fnd.framework.webui.beans.message.OAMessageTextInputBean;
  public void processRequest(OAPageContext pageContext, OAWebBean webBean)
  {
    super.processRequest(pageContext, webBean);
      CSSStyle css =new  CSSStyle();
             css.setProperty("text-transform","uppercase");
             OAMessageTextInputBean mtib=(OAMessageTextInputBean)webBean.findChildRecursive("HelloName");
             if(mtib!=null) {
             mtib.setInlineStyle(css);           
             }


Thanks
--Anil

Saturday, October 2, 2010

Submitting the Page on Enter Key - OAF

If you have a case where you want to submit the form when the user selects the Enter key.

So we will make the use of OABoundValueEnterOnKeyPress API & will associate ON_KEY_PRESS_ATTR attribute with the bean that needs to submit the page when ENTER key is pressed


import oracle.apps.fnd.framework.webui.beans.message.OAMessageTextInputBean;
import java.util.Hashtable;
import oracle.apps.fnd.framework.webui.OABoundValueEnterOnKeyPress;
import oracle.apps.fnd.framework.webui.OAWebBeanConstants;


public void processRequest(OAPageContext pageContext, OAWebBean webBean)
 {
   super.processRequest(pageContext, webBean);

    //Enter Button Handling
//HelloName is the Id of the bean in which user will enter some value and press Enter Button
OAMessageTextInputBean HelloName = (OAMessageTextInputBean)webBean.findChildRecursive("HelloName");

if (HelloName != null)
 {
   Hashtable params = new Hashtable();  
   params.put ("Go", "Go"); 
   HelloName.setAttributeValue(OAWebBeanConstants.ON_KEY_PRESS_ATTR,
       new OABoundValueEnterOnKeyPress(pageContext,
           "DefaultFormName",  //enclosing form name
            params, 
            true,  //client validated
            true)); // server validated
           }                                      


  }
public void processFormRequest(OAPageContext pageContext, OAWebBean webBean)
{
super.processFormRequest(pageContext, webBean);

if (pageContext.getParameter("Go") != null)
    {
       //Once Enter Key is pressed you can handle it here.
    }
  }

How to Restrict user from entering special characters using Regular expressions- OAF

In this exercise we have taken hello world page shipped with Toolbox Tutorial.

We are going to restrict user from entering special character on page. For this we have written the code in controller processFormRequest Method & handle the logic on Go Button.

Hence When a user clicks on Go button a validation is done for special characters being entered by user if it is then an error message is shown on the screen as shown in the picture else it will display confirmation message on screen.


Here is the code snippet to handle this validation .

Controller Code

package oracle.apps.fnd.framework.toolbox.tutorial.webui;
import java.util.regex.*;

  public void processFormRequest(OAPageContext pageContext, OAWebBean webBean)
  {

    super.processFormRequest(pageContext, webBean);

    if (pageContext.getParameter("Go") != null)
    {
      String userContent = pageContext.getParameter("HelloName");
      String message = "Hello, " + userContent + "!";

     Pattern p = Pattern.compile("[^a-zA-Z0-9\\s]");
     Matcher m = p.matcher(userContent);

     if (m.find())
     {
      throw new OAException("Special Characers not Allowed", OAException.ERROR);
     }

      else
      {
        throw new OAException(message, OAException.INFORMATION);
    }

    }

Thanks
AJ

Friday, September 24, 2010

Popup in OAF - R12.1.2 Part II

If you have not gone through Popup first exercise then please go through to get brief intro about Popups.

Popup in OAF Part1

We can also UPDATE  through Popup region without navigation to update page.


The  region  popups when user click on update inline image.

We will be creating a new External Region EmpPopupRN for this popup. No need to give AM definition for this region. Add a submit button & beans in this region for which you want to update Set the VO attribute and VO name same as the VO of results table i.e. EmployeeSummaryVO.


Now in your Results table of Search Page Add a flowLayoutRN and under it create an item of style image and a region of style popup.


Now click on your popup region EmployeePopup and set its properties

Region             Path of above External Region EmpPopupRN
Title                 Update Employee
Height              190
Width               380


Now click on image Set the following properties.


PopupId                                  EmployeePopup
Popup Render Event             On Click
Popup enabled                        True

Now in our page as we will be having a save button so we need to handle this button and post the data when user clicks on it. So we will be writing our code in PFR of EmployeeResultsCO


if (pageContext.getParameter("Save") != null )
 {
 OAApplicationModule am = pageContext.getApplicationModule(webBean);
 am.invokeMethod("apply");
 }

//and this calls out Apply method in AM

public void apply()
{
 getTransaction().commit();

}

Now you can run your page and see that now you can update the fields without navigating to other page.

Compare VO row with Database row - OAF

Comparing VO row with DB Row to ensure that user has changed some VO Attribute value or not when user is submitting the page

Thanks
--Anil

Controller Extension in R12 - OAF

Controller/CO Extension - Jdev10G


Thanks Ajay for giving such a nice article 

Oracle does not recommend that customers extend controller objects associated with regions or webbeans in shipped E-Business Suite product pages. 

Controller class (oracle.apps.fnd.framework.webui.OAControllerImpl) methods should effectively be considered private, since their implementation is subject to change. Controller extensions are therefore not considered to be durable between upgrades. 

If it is absolutely essential to handle custom form submit events on a shipped product page, processFormRequest() is the only method that should be overriden in a controller class, although the risks outlined above still apply.

In this exercise I am going to extend CO of  ItemSearchPG of Lab solutions exercise shipped with Jdev Tutotrial.

The purpose of this exercise  is to modify the VO query of results table. I have changed the Item Number field Property "Selective Search" as False. Now when we click on Go button all the records are displaying in the results table and our OBJECTIVE is to bind the VO query of results table in such a way that Results name should not contain record for Item Number 3

If "About this Page" link is not available on page then set the Profile Option: FND :Diagnostics to "Yes" at User Level.
Now for knowing which controller to extend we click on "About This Page" Link and select Expand All.


Here we can see the Name of the controller that we need to extend.

So open Jdeveloper and create New OA Workspace and new Project under it as shown in below screen shots.

Click on File à New to open this window

Give the Workspace Name as OAExtenstions , check on Add a New Project and click Ok. 


This cause Project creation wizard to open. Name the project as OAExtensionsPrj and Default Package as xx.oracle.apps.fnd.framework.toolbox.labsolutions


Click on Next and move to Step 3 of 3 Give your DBC file name, User Name & Password for Apps , Responsibility Name and Application Short name. Then click next.


Now Right click on Your project and select New à General à Java Class click ok


Give the Name of your Extended Class give its  package path and in the extends property select base class.

Important : You need to copy the class file mentioned in Extends Property to MyClasses Folder if it is not there.

Name       :        XXItemSearchCO
Package   :        xx.oracle.apps.fnd.framework.toolbox.labsolutions.webui
Extends    :        oracle.apps.fnd.framework.toolbox.labsolutions.webui.ItemSearchCO


Write the logic in the extended controller file as needed
package xx.oracle.apps.fnd.framework.toolbox.labsolutions.webui;

import oracle.apps.fnd.framework.OAApplicationModule;
import oracle.apps.fnd.framework.toolbox.labsolutions.server.ItemSummaryVOImpl;
import oracle.apps.fnd.framework.toolbox.labsolutions.webui.ItemSearchCO;
import oracle.apps.fnd.framework.webui.OAPageContext;
import oracle.apps.fnd.framework.webui.beans.OAWebBean;
import oracle.apps.fnd.framework.webui.beans.layout.OAQueryBean;


public class XXItemSearchCO extends ItemSearchCO {
    public XXItemSearchCO() {
    }
   
    public void processFormRequest(OAPageContext pageContext, OAWebBean webBean)
     {
       super.processFormRequest(pageContext, webBean);
         OAApplicationModule am = pageContext.getApplicationModule(webBean);
         OAQueryBean queryBean = (OAQueryBean)webBean.findChildRecursive("QueryRN");

         //Capturing Go Button ID
         String go = queryBean.getGoButtonName();
       
         //If its Not NULL which mean user has pressed "Go" Button
         if(pageContext.getParameter(go)!=null)
         {
         // Setting whereClause at Runtime to restrict the query 
         ItemSummaryVOImpl vo = (ItemSummaryVOImpl)am.findViewObject("ItemSummaryVO1");
         vo.setWhereClause(null);
         vo.setWhereClause("Item_id <>:1");
         vo.setWhereClauseParam(0,3);
         }
     }
}


Now we need to attach this new controller with the page through personlisation. So click on Personalize page link on top right hand side of your page. If you are not able to see this link set Profile Option "Personalize Self-Service Defn"  to Yes.


Click on Complete View à Expand All and click on personalize icon next to pageLayoutRN


Now at site level give the path of extended controller as we are extending the controller at SITE LEVEL


Click on Apply Button and Return to Application.

Now you can check by click on Go Button that you are not getting Item id 3 rest are there.


That all ... :)